

HI,
Thanks so much to everyone that entered. My hubby drew "Nanna" from Nanna's Raggedy & Prims.
I hate to have just one winner when so many entered, I picked 3 other names to win 5 patterns each:
#1. Patti- from Wild Berry Primitives
#2 Chatty Kathy
#3 Murray Hill Mercantile
So if Nanna would email her 10 pattern choices with name and address and Patti, Chatty Kathy and Murray hill with their names and addresses and 5 pattern choices. I will get these out to you.
Thanks to everyone that entered.
Sunday, January 31, 2010
Thursday, January 28, 2010
Pattern Giveaway and How to pinch stitch


I am having a big giveaway, I am giving away 10 patterns (your choice) from our YOU ARE SPECIAL site at: http://www.youarespecialpatterns.com/
You must be a member of my blog to enter and you must a leave a comment and a email address if you don't have a blog.If you get another person to join my blog you get a second chance at the drawing, just leave me another comment stating that your friend joined.
I have several people call me and ask how to the do the pinch stitch on the nose. I find it hard to describe how to do some of the techniques over the phone. So hoping this will help.


I drew the lines on this doll, with a black marker, as I going to paint her black. But knot your needle and insert needle in back of head, coming out where you want to start your stitch.

Take your hand and kind of pinch it together and insert your needle under the mark and picking up a little stuffing come out on other side of line.

You can see in the pictures the finished eyebrows, just run your needle down to the starting point at top of the nose and start pinching your nose and do the same, picking up alittle more stuffing to make is stand out more.


Just continue on the mouth and when you are finished stitching, just knot off.

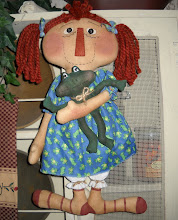
All done and now ready to paint. This was the doll from my newest pattern at the Olde Country Cupboard.
This is her face painted.

Tuesday, January 26, 2010
New doll and stuffing.
Hi,


I am sorry it has taken so long to update. I am having trouble getting ahold of the winner of the bagholder, If any one knows Country Pickins please let me know how to get in touch with her. Or if you are reading this please email me at info@youarespecialpatterns.com. I don't think my emails have been getting through. Been working on some new stuff. I just finished a new Annie pattern, I am going to call her Annie's Snowman. She is a big girl. She is a little on the bright side, I used lots of reds on her. I have aloy\t of people ask wher I buy my yarn for my doll's hair. I buy it at Joann's. They have skeins of yarn that are perfect for raggedy's.

I have been asked how I stuff my doll's, I tried taking some pics, hopefully these will explain how I do it. I had to take myself stuffing, so hope they make sense.

I have my doll body sewn up, just have to turn it and then stuff it.

I use a chop stick, I grab some stuffing and kind of wrap it around the end of the chopstick and then stuff down into the leg or arm. Just keep adding a little at time until you get stuff firmly. I kind of flatten the stuffing down as I go. I just mash down on the outside and try to keep flat and from bunching out.


Next I stuff the body and head, I stuff with little bunches of stuffing. I use the stuffing in the green and white box at Walmart, not the polyfil, that is too soft, I can't stuff tight enough with it. Just keep pressing the doll body flat as you go with your hands, to keep it flat.

Do you ever get a wobbly neck, this is one trick I use to help keep the head from flopping too much,
take a stitch under the neck line, going from back to front with heavy thread.


After you have stitch back and forth a couple of times, knot off your thread, you will have an indentation there. Just continue to stuff around the body and stitch.


I like to fold the bottom seam up and stitch my doll's legs into the opening and whipstitch closed. I don't use a machine stitch across. Just have to be careful to keep the legs even at the bottom. I hope this helps a little, I have stuffed a ton of dolls over the years and I have noticed no one stuffs the same, the same doll can look so different depending on who stuffs it.
Tomorrow I will show you how to pinch stitch and the finished doll face.
Sunday, January 10, 2010
The winner of the Bagholder is.....
Hi,
the winner of the bagholder is CountryPickins.
So if would please email your address, I will get her right out to you.
I want to thank all who have entered this giveaway, will be having another one.
I will have a couple more patterns available very shortly on this site.
Thursday, January 7, 2010
Raggedy Ann Bagholder giveaway

I have a Raggedy Ann bagholder that needs a good home. In this giveaway, you must be a member of my blog and leave me a comment. I will draw name on Sunday for the winner.
Be sure to check out the free pattern at the bottom for Valentine stitchery tags.
Doll hair and how I attach to doll's head

I have been emailed several times, wanting to know how to attach doll hair. This is the way I do it.
I cut the yarn to the desired length. I insert my needle into the first place I want to start attaching hair.

I usually put 4 or 5 pieces together, depending on the thickness of the yarn.

I fold the clump of yarn in half to find the middle.

Keeping the yarn folded, insert your threaded needle through yarn clump, be sure to go under entire group, come back around and insert back into head where you started and knot it, but don't cut thread. Depending how tight you stitched it to the head, you may want to put a couple of stitches to secure. Just insert your needle back into the head and come up in the next place you want to attach a clump of hair.

another view


you can see how I keep coming up at the next point where i want to attach, when you have the desired amount, just knot off and secure your thread. Trim the ends if needed.

Well, I hope this helps, it is sometimes hard to explain things, but hoping these pictures give you an idea of how I attach the hair.
Sunday, January 3, 2010
Welcome to our New blog for You are Special patterns
#312 Annie and Her Easter Eggs

Well, this is my first post here, I won't be posting a lot on this one, probably not more than once a week, this one is just for my new items I am going to add to the You are Special website, I kind of been a little lazy on this site. http://www.youarespecialpatterns.com/ so I need to get busy adding more patterns.
I think I have finally managed to figure out e-patterns, I made up my first pattern called Annies Easter Eggs and I am offering here on the blog for $4.00. this is a test run, so it you have any problems, just let me know. Just click on the side button on the blog for the pattern. This special price is only available on the blog for a limited time. It won't be added to my website until later on in the week.On this blog, I am going to try to give you all some tips and techniques that I have learned through trial and error. I will also keep you up to date on new patterns on the You are Special pattern line. I am going to try to have e-patterns available for any new patterns that come out. I have a couple of new patterns coming out this month, the Annies and her eggs, Seasonal Annie: this pattern includes an Easter, Fall and Christmas version.
I learned along time ago, that some things I took for granted when sewing, others didn't know or hadn't realized what I meant. I once asked a friend to cut out some felt ornaments pieces, I told her I needed 2 of each one, thinking that she would place two pieces of the felt together and cut them out a one time, but no, she cut each piece out separately and needless to say, I didn't have any pieces that matched when I tried to handstitch them together. So now I try to be very concise when I give instructions to people to do handsewing and finished items. But I have to say, I am very picky and don't like to have any one else sew for me as I like the way I finish items. I tried it once and the shop keeper that wholesaled from me asked me if I sewed these. So I learned the hard way. Do it myself.
Some tips that might come in helpful:
1. When you want to pre-shrink fabric before cutting out your pattern, zig-zag or serge the raw edges of the fabric. This prevents the fabric from fraying in the wash.
2. When threading a needle, don't moisten the end of the thread as this will cause it to swell up and make the job more difficult.
3. Always wash your muslin before you dye it, this will help it absorb the dye better.
Some of the questions I have been asked is How do I tea-stain. I used to use tea bags, but now I use the liquid tan Ritt dye in a bottle. I buy it at Walmart. Just follow the instructions on the bottle. Let it dry, I use the clothesline, iron it to get most of the wrinkles out when dry. I make my doll, and if I want her a little more stained after I have finished her, I have a spray bottle with a mixture of coffee and water that I spray her down with. Be sure you take a cloth and smooth her face good after you have sprayed her, her face won't be blotchy that way. Another way is too lightly spray the body with coffee/water mixture and take a hot iron and iron it dry. This will give it a grungier or dirtier look, but practice first. This is the method I use on my stitcheries. I stitch the design onto fabric backed with warm and natural. Then take my spray mixture and spray on the stitched piece and iron it dry. I keep spraying the areas I want darker and ironing them dry till I get the look the I want.
I just got my latest pattern finished, this one is going to be in the new issue of Country Sampler, I call her Seasonal Annie. This pattern features a 20" raggedy with three different variations, fall, Christmas and Easter. I made quite a few of the gingerbread Annies at Christmas and sold them all as fast I put them out.


I will have a link on the side bar to purchase this pattern, I will have the e-pattern done in a day or so, the printed is available now. I am waiting on my webmaster to update my site for me. I have lots of new ideas and hope this year goes much better and I can get everything done that is on my list. Which by the way, keeps growing every day. Check back tomorrow, I am trying to get a tutorial on how I attach my doll hair.
Thanks for reading.
Subscribe to:
Posts (Atom)


.jpg)


.JPG)


